#Valentine’s Day Tea

As you can probably tell by my posts, I love parties. There is nothing better than spending time with loved ones. Add in some delicious food & beautiful decorations and you have a perfect day! A very close family friend hosted an absolute gorgeous garden Valentine’s tea party this past weekend for the littles in our circle. Nothing like seeing our sweet kiddos all dressed up & sipping their pink lemonade out of fancy tea cups. Of course I think some of the beautiful, sophisticated decor was lost on them since all of the kiddos ended up playing in the ditch (so funny how things like that always make them happiest), but as parents we can appreciate the pretty event & enjoy sharing “grown-up” things with them. Anyways, on to the pictures…

IMG_4604[1]

Each table was beautifully decorated and had its own tea pot & selection of kid-approved lunch snacks.

IMG_4608[1]

IMG_4607[1]

There was a table set up for the kids to decorate their own bags for the Valentines exchange. *Side note: We had this party right after Valentine’s Day so everything was at least half off! Score!

IMG_4625[1]

Arts & crafts are a good idea for every party!

IMG_4589[1]

Destiny made heart crayons for her valentines. Click here for a link to that idea.

IMG_4606[1]

Photo booths are the perfect way to get a great shot to remember the event.  A nice back drop & a few simple props are all you need. Kids are more likely to do a photo shoot when they get to play dress-up! Who wouldn’t be?

IMG_4616[1]

IMG_4615[1]

Destiny & I ❤

IMG_4618[1]

Such a cutie!

IMG_4605[1]

L O V E this!

IMG_4620[1]

Dessert table… cause isn’t this the best part of any party? lol

IMG_4628[1]

Notice those little chocolate pinwheels… cut up a few Little Debbie’s for a quick & easy dessert!

IMG_4627[1]

IMG_4624[1]

Rice crispy treats are always an easy crowd-pleaser & they can easily be transformed to fit any theme. A heart shaped cookie cutter, melted chocolate, & pink frosting gave these a sophisticated look.

IMG_4602[1]

Marshmallow pops are super easy to make. Grab some paper straws from your local Target & sprinkles to match your theme, and you have an easy yet beautiful dessert to brighten any table. I talked about these before here.

IMG_4633[1]

Getting a group shot is always a challenge, but as you can tell these kiddos had a blast!

Hoped you enjoyed this party idea as much as I did, and I hope you & your loved ones had a wonderful Valentine’s Day!! ❤


#USA Plaque

I can’t seem to get back into the habit of blogging like I once was. With school starting back, things have been super crazy around here. My daughter, Destiny, decided to kick off the 2nd week of school by getting sick & sharing those elementary school germs with her mom. After almost 3 days of doing nothing but sleeping & resting on the couch, we are finally feeling a bit better. It’s back to school for her tomorrow so she’s in bed, but due to all the extra rest, my sleep schedule is completely out of whack & when I should be getting to bed myself, I am WIDE AWAKE!! I figure I’ll wind down while I share a craft project I did for the 4th of July this year, once again better late that never! I’m not exactly sure what to call this creation… I used for the front-door but it would make a super cute wall plaque as well.

IMG_3614[1]

The finished product – a super simple, country-style decoration perfect for Independence Day or all year long to show your support for this great country 🙂

IMG_3432[1]

Supplies: *red, white, & blue paint *painters’ tape *paint brushes *wood plaque (I planned on making my own from an old pallet, but came across a pre-made one in the Wal-Mart craft section that looked exactly like I wanted which already had a rope attached for hanging & couldn’t pass it up – saved a bunch of time) *U, S, & A letters (wanted wood, but they only had pressed cardboard ones in stock so I settled for those – you’ll also notice that the S is smaller, not an artistic choice, I was just too inpatient to wait for them to get the bigger ones in lol) *E-6000 (definitely a good all-purpose permanent crafting glue)

IMG_3434[1]

Tape along the slats for nice clean stripes.

IMG_3435[1]

Paint your red stripes & allow to dry.

IMG_3437[1]

Remove the tape.

IMG_3438[1]

After you protect your red slats with painters’ tape, it’s time to paint the white stripes.

IMG_3439[1]

Remove the painters’ tape & let your plaque dry completely. It’s time to paint your letters a nice shade of blue. I painted the front, back, & sides of these in different stages, allowing them to dry completely in between sides. Not only did I want to cover the cardboard completely for aesthetic purposes, I also wanted them to hold up in the humid Florida weather & used the paint to keep out unwanted moisture & keep this decoration in good condition for years to come.

IMG_3441[1]

After all the letters were dry, I attached them to the front of my plaque with E-6000.

IMG_3442[1]

I forgot to mention that I also painted the edges of the slats because, well, it just looks better that way… you might have noticed I had taped them off, but I thought it would be easier to show you the effect in this close-up.

I love craft projects & was super-thrilled with how this one turned out. I had originally planned on incorporating stars into it someway, but kind of like how simple it turned out. I’m always telling the kids that sometimes adding too many details can end up looking gaudy so I decided to take my own advice. I would love to hear what ya’ll think of this project! I know I’m a month behind, but did your family make any patriotic crafts or recipes this year? I’d love to hear about them!

#Happy 4th of July 2015 #Patriotic Star Candleholders

IMG_3451[1]

Happy belated 4th of July!!

Independence Day is one of my favorite holidays. From fireworks to family cookouts while celebrating our country’s freedom, what’s not to love? What better to start my blogging come-back with than some super easy patriotic star candleholders? As with all my craft projects, decorating ideas, & party planning, I’m all about creating masterpieces without spending a fortune. Simple, easy, & inexpensive is the way to go!

IMG_3383[1]

Patriotic Star Candleholders

I made a set of 4 of these candleholders for under $10 last year & added a cute table runner from Target this year to complete the look. Ok, let’s get started…

IMG_3619[1]

Supplies:

  • glass candle holders (Dollar Tree – I used square ones.)
  • small white pillar or votive candles (Dollar Tree)
  • red & blue tissue paper
  • small paint brush
  • scissors
  • pen or pencil
  • Elmer’s glue or any craft glue that dries clear

The process is as simple as the supply list! Lightly draw draw stars on your tissue paper & cut out. I free-handed my shapes so each star varied in size & shape slightly, but if that is too difficult, you could use a stencil for more uniform stars though if you do this I’d have at least 2 size stars for some variety. I used 12 stars, 3 stars on each size, half blue & half red, but this is purely an artistic choice. I wanted just a few simple stars though more stars covering the candleholder more thoroughly & overlapping would be another cool look. Once you have your star shapes cut out, use your paint brush to simply apply a thin coat of glue to one side of your star & press on your candleholder in the desired location. Repeat til all stars are in place. Make sure corners are coated well so they don’t peal up though if this happens you can also go back & paint this corners down with a bit more glue. While the stars are damp they tear really easy so be careful, but the good thing is tissue paper is cheap & the wet glue comes off easily with a damp cloth so any mishap can be quickly fixed. Once you have added all your stars, simply allow glue to dry & add the candle of your choice. Basically it took me longer to type this than your whole project & probably even gathering the supplies did (LOL), but as you can see adding a little holiday flair doesn’t have to be time-consuming or expensive. This idea could be easily changed up to fit any holiday. You could even give your candleholders a hot soapy water soak to remove the glue & tissue paper & reuse them. You could cut out some green shamrocks for St. Patrick’s Day, egg shapes for Easter, fall leaves, & maybe some holly & berries for Christmas… the possibilities are endless! Stay tuned for some other 4th of July decorating ideas & maybe a recipe or 2! 🙂

#Tie-dyed Easter Eggs #Easter 2015


I’m still getting over being sick & just haven’t had the energy to do half of the things I wanted to do, make, or bake for Easter, but my kids weren’t going to let us skip dyeing eggs this year. It ended up being a blast (other than having to use a ton of bleach to get rid of all the dye that ended up on everyone’s hands and my counters lol) so I’m glad they didn’t let me be lazy. We tried a new way this year which resulted in the same “have I been doing everything the wrong way all my life” epiphany that I described in my Oven-Baked Bacon post. We’ve tried a couple ways of dying eggs throughout the years usually resulting in less than spectacular results. We’ve tried wrapping them with string or rubberbands to make stripes or adding stickers for a stenciled effect before dipping them but it usually resulted in the bands coming off mid dip or the stickers refusing to stick to our eggs, basically more frustration than fun. We’ve bought different egg dyeing kits some we’ve liked like & others were just a waste of money. Last year’s eggs turned out ok, kinda 50/50, liked some but on some of the eggs others the dye adhere well & came off in weird patches. The kids still enjoy it, but after this year experience, I think dipping our eggs is a thing of the past.

2014 easter eggs

2014 Easter Eggs

So after a little Pinterest-ing, I ran across this pin for Tie Dyed Easter eggs & was instantly intrigued. It is super easy & the results were so cool!

IMG_2981[1]

Here are some of this year’s Easter eggs… there are a few traditionally dipped ones in the mix & a few that my youngest did by just setting her eggs in a strainer in the sink, dumping the food coloring on them, & spinning them around (those also turned out pretty cool lol) but we are going to focus on the Tie Dyed ones.

Ok so on to how you make these beauties…

IMG_2984[1]

Here is a quick overview of our process before we get into detail…

Tie-Dyed Easter eggs

Supplies:

  • paper towels
  • ziploc bags
  • boiled eggs
  • vinegar
  • food coloring
  • plates (we used our regular dinner plates though plastic disposable plates would have been nice for easier clean up)

 Steps:

  • Dip your paper towel in vinegar & wring out excess.
  • Lay your paper towel out on your plate.
  • Add drops of food coloring until the colors pretty much cover the whole area *This is something where I told the kids not to put too much, but the ones that I believed were too “colorful” & would turn out looking black actually turned out better. Obviously their overzealous food coloring was perfectly fine. lol
  • Sit your boiled egg in the middle of your colored paper towel & wrap it completely.
  • Squish the paper towel around your egg & put the whole bundle into a plastic bag.
  • Let the eggs sit for about 30 minutes *The longer they are in there the brighter the colors got we did about 30 minutes, but some probably could have used longer. The original directions says anywhere from 5 minutes to a couple hours. Might just have to play with it at first to see what works best for your eggs.
  • Remove from bag & paper towel & sit your eggs out to dry.

IMG_3005[1]

Here are some of our completed Tie-Dyed Easter eggs. Unfortuantely the pictures really don’t do them justice, such beautiful colors & intricate designs that you’d have to see in person to truly enjoy!

IMG_3006[1]

Got a basket all ready to decorate our dinner table when we go over to Mema’s later 🙂

I hope you enjoyed this Easter egg decorating idea! Need some last minute ideas? Check out my Easter Pinterest board for inspiration! 🙂

IMG_2997[1]

Hope the Easter bunny brought you a bounty of goodies & that you have a blessed Easter with those you love!


#Bunny Buckets #Easter Egg Wreath Idea

I like to make little gifts for Destiny’s classmates a couple times a year. With Easter right around the corner, I looked on Pinterest for inspiration & found some really cute ideas. You can see some of my favorites on my Easter board by clicking here. I originally saw an adorable mason jar idea that I thought looked like a nice option but would need to do it with smaller jars since I have to make 18 & buy enough candy to fill them. I’ve been super sick for about a week now & not feeling well as that was coming on so after not being able to quickly locate the size & shape jars I was searching for, I abandoned that idea & started looking for alternate options. I often do just traditional “goodie bags” so I was trying to find something a little different this time. I have seen cute bunny buckets & saw some similar things on Pinterest, but still wasn’t finding exactly what I wanted so I started looking at the Oriental Trading website to see if I could locate something quick & easy to make since I didn’t feel like hand cutting bunny ears, noses, etc. in my current state.  What I love about Oriental Trading is that usually the craft kits & supplies as well as party supplies aren’t super expensive & they come in large quantities. I grabbed some 3″ white metal pails with handles & started looking through the Easter craft supplies to find something to easily make them into bunny buckets. I was tired & didn’t feel good so almost gave up when I happened across a Easter Bunny Picture Frame Craft kit. It wasn’t too expensive & had twelve kits just like the bucket quantity, and I felt that I could easily repurpose the supplies to fit my needs. Anyway enough of my tired ramblings, let me just show you what I came up with…

IMG_2923[1]

Here are my supplies… I only used the precut foam bunny parts & ribbon bows which already had peel & stick adhesive strips… yay… adorable & super easy to assemble. My only complaint about Oriental Trading foam craft kits in the past was that the self adhesive wasn’t as permanent as it should be, and unfortunately, while the majority of the bunnies held together fine, some of the front paws came loose in the night so I went through & added some Elmers glue to all the parts just to be safe. Even still I recommend this websites’ craft kits because they are adorable, inexpensive, easy to put together, come all individually wrapped making them perfect for large group events, & usually come with a few spare parts just in case. Only keep in mind that you might want to save the extra step when using ones with self-adhesive strips & just go straight for your glue during assembly for longer lasting, sturdier creations. I ended up with 24 foam frames, frame backs, magnets, & tons of foam circle stickers that I didn’t use, but I definitely will be able to add these to my craft supply stock for a future project! They won’t go to waste in this household. you might even see them in a future blog post! lol

IMG_2922[1]

They say a picture is worth a thousand words… so I’m gonna skip lengthy, step-by-step directions and just show you how we put these bunny buckets together. Destiny has 9 girls & 9 boys in her class so she wanted to only add the bows to the girl bunnies.

IMG_2927[1]

I think they turned out just perfect… just like I pictured them in my head! Since the buckets are quite small, I didn’t have to buy a lot of candy to fill them up either, just a pack of fun size Easter M&Ms & 3 small pieces of candy & they are ready to go!

It’s been a rough month so far for me… first a back injury & then 2 weeks later I was down with bronchitis & an upper respiratory infection… so I am awfully bummed I haven’t gotten to the many Easter craft & recipes I planned to make & share with you. That’s life though, doesn’t always go as planned. It seems like the older I get, the faster time flies by or maybe it’s just because we are busier. I’m not even sure when I will fit dying eggs in or helping the Easter Bunny fill the baskets so this might be my only Easter related post this year. :/

IMG_0201

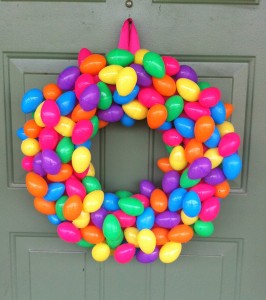
Here is another one of my past Easter projects I wanted to share. I’ve made Easter Egg Wreaths since then for family members. It was one of my all time favorite Pinterest projects & probably one of the first ones I actually saw & made. It just takes a few supplies: ribbon, hot glue, a foam wreath, & lots & lots of plastic Easter eggs.  I’ve had this one for years… still looks just as bright & festive every time I put it out & if, heaven forbid, I loose an egg or 2 in storage, a little hot glue puts it good as new! If you like this idea but your busy schedule keeps you from creating it in time, wait & take advantage of the 50% off Easter eggs that are always abundant afterwards. That’s what I did. Honestly most of my holiday decorations have been picked up for dirt cheap after that holiday is over & then I use them for the next year. Click here for detailed instructions. I believe this is the site I found through Pinterest when I made my first wreath.

149

Throwback to last Easter… I love this picture!!

In case life gets too crazy, I’ll just wish you a Happy Easter now, from my family to yours! ❤


#Heart Crayons

IMG_2587[1]Today I want to share one of our favorite Valentine’s Day crafts: Heart Crayons. These are a kid-friendly, easy craft that would be perfect for your kiddos to pass out to their schoolmates at their school valentines exchange or party! First I’ll tell you how to make them & then share some ways to adorable ways gift them that I’ve found on (you guessed it) Pinterest.

Supplies:

  • Silicone heart-shaped molds (These are sold places like Target or Walmart but are often a seasonal item. If you can’t find them in your area, lots are available for purchase online.)
  • Lots & lots & lots of crayons (Recently we’ve added glitter & metallic crayons to the mix for very cool effects.)
  • A baking sheet (foil-lined in case they splatter)

IMG_2603[1]

Directions:

  • Preheat oven to 225 degrees
  • Remove wrappers from crayons (This is the most time-consuming part so utilize those little helpers!)
  • Break crayons into little pieces.
  • Fill the silicone heart molds up about 3/4 of the way up with your crayon pieces (either completely multicolored or pick different shades of the same color… we’ve done both & they are equally awesome)
  • Put your filled mold on your foil-lined baking tray & place in oven
  • Bake your crayons for 15 minutes
  • Carefully take them out of the oven. (The wax will be fluid, & you don’t want to slush it around too much.)
  • Let cool completely. (After the baking sheet is cool, you can place it in a fridge or freezer to speed up the process.)

Pretty simple right, but check out the results…

IMG_2604[1]

Now for ways to make these adorable heart crayons into valentines for your kiddos to pass out…

heart crayon valentine idea

“Color your heart out Valentine!” from a cute blog I recently discovered, The Nerd’s Wife… click here to visit that post or to download the printable cards for free!

crayon-treats-400x266

“Happy Valentine’s Day for ‘crayon’ out loud!” This is another cute idea I found on Pinterest… It was on several sites so I’m not sure where it originally came from.

colorful friend valentine

“You make my world so very colorful, friend!” from The Brown-Bag Teacher blog… click here to see the post & snag a printable version!

So many adorable options to chose from… if all else fails, stick them in a cute little cellophane Valentine goodie bag! Hope you are having a colorful day! Gotta go watch outside to watch the SpaceX Falcon 9 rocket launch! Bye for now!


#Hershey’s Kisses Valentine Mice

With my youngest finally over her little bug, it’s finally time for those Valentine’s Day crafts I’ve been promising! First up Valentine Mice made with one of my personal favorites, Hershey’s Kisses! (I visited this subject before in my Merry Kissmas blog post.) I found this idea on Pinterest a while back but hadn’t had the pleasure of creating these adorable chocolatey creatures until now! They are a super easy, kid friendly craft! I had a very adorable mouse-making assistant today, Destiny, my 8 year-old! So let’s get started…

Hershey’s Kisses Valentine Mice

Supplies:

  • Valentine’s Hershey kisses (grab the big bag so you have some extra to fill those candy dishes)
  • small googly eyes (for some reason we only had multicolor ones but what the who)
  • foam hearts about an inch in size (we used a package of glittery pink & red table scatter we found at the Dollar Tree)
  • double sided mounting tape
  • glue dots
  • scissors
  • if you wish, thin ribbon or yarn for a tail (we opted to skip this step & leave the handy already included “Hershey” tails lol

IMG_2593[1]


Steps:

  • remove Hershey “tag” from one Kiss
  • use the mounting tape to adhere heart “ears” to the bottom of the Kiss
  • use another small piece of mounting tape to put another tagged Kiss to the back of the heart “ears”
  • attach a pair of googly eyes to your mouse’s face

Ok I feel like I butchered these directions… I mean I just looked at a picture & winged it so maybe that’s how you work too so check out these pictures of our finished product & hopefully my ramblings will make sense!

IMG_2598[1]After making these I felt like they were missing something, maybe attaching a tiny red or pink pompom nose. I looked all over the house, but unfortunately we are pompomless (made up crafting word of the day… it’s gonna catch on, I swear!) so we’ll leave them like this. They would make an adorable valentine for your kids’ to pass out to classmates! Just attach them to a cute little “cheese” card with a sayings like “Mice to know you!” or “You are so mice!” It might sound a little cheesy to you (See what I did there?), but they are adorable & I’m not the only one who thinks so. Click here for proof! lol Mine however are chilling on my living room table because what better than cute little mice to decorate with  & we already made little goody bags for Destiny’s class. Give these a try & let me know what you think! I’d love some feedback & maybe some pictures! I’ll bet they’ll turn out totally “mice”!! Get it? Mice instead of nice! I thought it was funny, but I do get weirdly silly when I’m overly tired! Good night lovelies!

#Scarecrow Craft Project


At the beginning of the year, the parents were asked to sign up for a month to provide & do a craft with my daughter’s 3rd grade class! I signed up for November because I love fall! However in between a planning a birthday party (still haven’t gotten a chance to share that with you but will soon) & our busy life I completely forgot about it… until a week ago when I got an email from the teacher asking what day was good for me. Aaaaa! So I went right to my favorite source of inspiration, Pinterest, and started searching for fall crafts. I found this adorable scarecrow craft project & knew this was it! After a last minute trip to Hobby Lobby & Dollar Tree, I was ready to start prepping the craft kits. The pin I found used craft foam sheets, but I opted for felt with some cardboard backing instead. Interested in a great fall craft to do with your kids or class? Here’s what we did:

IMG_2138[1]

My Scarecrow

Materials:

  • Jumbo Craft Sticks
  • Cardboard
  • White Glue
  • Jute cord (ribbon or yarn would be another good option)
  • Felt (we used brown & orange)
  • Raffia
  • Googly Eyes
  • Marker or Crayon
  • Fall leaves or similar decorations

Directions:

  1. Lay out 5 jumbo craft sticks side by side and and glue them down on a piece of cardboard.
  2. Glue raffia to the top of the craft sticks in a messy fashion to create the scarecrow’s “hair”.
  3. Make your hat: Cut your felt rectangle to the shape of a hat (I added some cardboard to the back ahead of time so it stood up. If you opt for the original craft foam you can skip this step.). Glue down the strip of felt to the hat and add your fall embellishments if you’d like.
  4. Glue your hat to the top of the raffia. (This is the last piece that usually dries, so tell the kids to put a good amount of glue on the rafia, push the hat down firmly, then leave it alone- it will harden, I promise!)
  5. Add your face: Glue down 2 googly eyes. Glue down the triangle nose. Draw a smile with a crayon or marker.

AND YOU’RE DONE!!!

Since I was doing this with 18 3rd graders in a short period of time, I glued the craft sticks to the cardboard, added a jute cord “hanger”, & made the felt hats ahead of time. I used some ziplocs to make some little craft kits to pass out to each student.

IMG_2134[1]

Scarecrow craft kit

Usually we go with “a little goes a long way,” but this craft especially the gluing the rafia & hat to the scarecrow face required loads of glue & even a little weighing down. The kids seemed to thoroughly enjoy making their scarecrow & it wasn’t too time consuming with all the prep work done ahead of time.

IMG_2136[1]

They turned out so cute!

IMG_2137[1]

Although some of the boys’ took a little creepy turn. lol You could definitely see the kids personalities in the finished projects.

The project idea & pin originally came from here. It’s a really neat blog; definitely check it out!! Happy fall!

#First Annual Halloween Craft & Movie Night

Love crafts & Halloween? What better way to add some creativity & Halloween fun into your week then a Halloween craft & movie night! I ordered some inexpensive, easy craft kits from Oriental Trading when I placed an order for supplies for Katlyn’s upcoming pink mustache birthday party, gathered a few snacks & supplies, and recorded a selection of the family Halloween movies we watch every October to get ready. Let the Halloween fun begin…

IMG_1973[1]

No party or event is complete without a few snacks!!

IMG_1975[1]

After snacks were eaten & hands were washed, we turned on the Nightmare Before Christmas and started the first craft of the night: No Sew Halloween Pillows

IMG_1983[1]

The girls posed with their finished pillows.

IMG_1988[1]

The pillows made a perfect addition to our living-room decor!

IMG_1987[1]

These were so easy to make & very cute, but we did find out this morning that the self-adhesive on the foam pieces wasn’t as strong as it seemed so added some glue & they are drying now.

IMG_1989[1]

A few lollipops, some scrap white material, Halloween ribbon, & a permanent marker = Ghost Pops, perfect for giving out to trick-or-treaters or your child’s classmates!

We just did this as a family this year (plus one friend), but this would be a perfect idea for any size group! Having a large get-together? Have each family attending bring a snack to share &/or supplies for one craft. Spending time & making memories with those you love is what’s important! It’s something we all need to remember as we speed towards the season of “I want!” Just a little food for thought on this beautiful October day 😉

#DIY Spooky Candlesticks

IMG_1913[1]

Supplies: 2 glass taper candle holders (Dollar Tree has a great selection of these), black spray paint, heavy duty glue (I had some E-6000 lying around & it worked great), & 2 pillar candles (I found 2 orange pumpkin pie scent ones that worked perfect)

IMG_1914[1]

Glue the narrow ends of the candle holders together and let dry. Check out the instructions on your glue before hand to make sure you know how long it needs to dry completely! Remove stickers (if any). Then it’s time to spray paint. Several thin coats with adequate drying time in between work best to avoid drips in the paint & get a nice even coat!

IMG_1912[1]

Finished project… such an easy, cheap project to add a little elegant spookiness to your Halloween decor