#Sicilian Chicken Soup

One of our favorite date night spots is Carrabba’s Italian Grill. Unfortunately, being parents & NOT being made of money, date nights don’t happen as often as I’d like. Yesterday, I felt like doing a little experimenting in the kitchen & after doing a little searching, I ran across a copycat recipe for one of our favorite Carrabba’s recipes Sicilian Chicken Soup from A Dash of Sanity. Dinner idea? Yes please! Now before I share the recipe, I have a little confession to make. I am extremely OCD. Anyways, after hours of waiting for the soup to be ready, smelling the delicious aromas, I may have had a meltdown when it didn’t turn out right, dump the whole pot into the garbage disposal, & head to Wal-Mart (aka hell on Earth) at 10:30 at night to re-buy the ingredients & try again. Not one of my proudest moments, crying over soup… my significant other & best friend might now think I need counseling lol… but I am pleased to say the 2nd attempt was a wonderful success & everyone gobbled it up! Don’t worry; I know where I went wrong & will pass the knowledge on so you will not make the same mistake & end up with delicious soup the FIRST time!

IMG_4681[1]

Sicilian Chicken Soup

Ingredients

  • 1 whole chicken (4 to 5lbs)
  • 1 yellow onion (chopped)
  • 4 celery stalks (diced)
  • 3 carrots (peeled & diced)
  • 2 red bell peppers (diced)
  • 2 medium potatoes (peeled & cut into chunks)
  • 1 – 14.5 ounce can diced tomatoes
  • ½ cup fresh Italian parsley
  • 5 garlic cloves (minced or squished with garlic press)
  • salt and black pepper, to taste
  • ½ lb. ditalini pasta
  • 1 T. of cayenne pepper (my addition)
  • chicken broth or water (about 64 ounces)

IMG_4676[1]

Directions

  • In a large soup pot place whole chicken, onion, red peppers, celery, carrots, potatoes, diced tomatoes with their juices and then add enough cold water or broth to cover chicken. Over high heat bring to a boil.
  • Then add parsley, garlic, salt, black pepper & cayenne pepper.
  • Reduce the heat to medium-low, cover partially with a lid. Let it simmer for 2 hours, or until chicken is falling off the bone.
  • Remove chicken and let it cool, for 30 minutes or until cool to the touch.
  • Reduce heat to low and let the soup continue to simmer.
  • Remove all the meat from the chicken and shred the chicken into large pieces. Discard the skin and bones.
  • Using a potato masher, mash the soup around a few times.
  • Add the shredded chicken to the pot.
  • In a medium sauce pan cook pasta as directed on box. Drain well and set aside in a bowl.
  • Original recipe says to add noodles at this time… I made 2 mistakes here. First I thought we’d like a few extra noodles & made a whole box. Secondly I put them into the hot soup & they swelled up like nobody’s business soaking up most of the delicious broth & turning into complete mush. Please learn from my mistakes & wait until you are to serve! The 2nd attempt I made the soup but didn’t add the noodles to the pot instead I scooped some noodles into the individual soup bowls & added the soup on top, worked like a charm! The 1/2 lb was plenty as well!

IMG_4686[1]

I served our soup with some homemade cheddar biscuits. I definitely will be adding this recipe to our family favorites, especially when we haven’t gotten a date night in in awhile! As for failing, it’s part of cooking & life in general! All we can do is realize we aren’t perfect, grab a spoon, & TRY AGAIN! Hope you give this one a shot! 🙂


#Mad Scientist Day

One of the perks of private school is the class parties & hands on learning. This year (actually the end of last year but I’m a bit behind) my daughter’s 4th grade teacher combined a science project & party into a super cool mad scientist day. The children were each required make up a fake scientist name, come up with 5 to 10 minute science experiment they could easily preform, and write a quick summary introducing themselves & explaining their experiment. This was Destiny’s…

My name is Dr. Spikenstein. Monsters don’t often go to college, but I loved science so I worked really hard and was accepted into Hogwart’s University. I aced my classes and graduated with a master’s degree in Monsterology. I also got my bachelor’s degree in Scientific Potions. I liked using science to make magical things happen so much that after graduation I started teaching Potions 101 at the university. One of my favorite experiments we did in my potions class was the self-inflating balloon. Mixing vinegar & baking soda creates a chemical reaction that produces carbon dioxide. Once the carbon dioxide fills up the bottle, it needs more room so it expands the balloon. It looks like the balloon is magically blowing itself up. Unlike helium that is often used to fill balloons, carbon dioxide is a heavier gas than the air so instead of floating around, the balloon will fall straight to the ground. Want to try this experiment out for yourself? Here is how…
 
Supplies:
·       Vinegar
·       Baking soda
·       Plastic funnel
·       balloon
·       Tablespoon
·       glass measuring cup with a spout
·       bottle with a narrow top (example: a plastic water bottle)
Instructions:
1.   Use your funnel to put 3 Tablespoons of baking soda into your balloon.
2.   Using your measuring cup, pour ½ cup of vinegar into your bottle.
3.   Stretch the open end of the balloon over the neck of the bottle making sure the balloon is on securely.
4.   Pick up the balloon so that all the baking soda falls into the vinegar at the bottom of the bottle.
5.   Sit back and watch the balloon magically expand!
It is a great experiment to try with the kiddos, & I thought the scientist she created was very imaginative too! Anyways, after the kids demonstrated their experiments in front of the class, the teacher & room-mom gave them this wonderfully themed party. I was impressed. Destiny was too so we might even steal the idea for a birthday party theme some time. I’ll let the pictures tell the story…
IMG_4208[1]
The classroom was decorated with all sorts of “sciency” things…
IMG_4206[1]
IMG_4196[1]
IMG_4199[1]

The kids each got safety glasses, science lab badges, & Biohazard goodie bags.

IMG_4209[1]

No mad scientist party is complete without a nice cauliflower “brain” in a jar!

IMG_4211[1]

And then they had snacks…

IMG_4207[1]

Petrie Dish Jello… Click here for Pinterest links for this idea… These used gummy worms, but other good options were Nerds & sprinkles for fake bacteria & cells. PS The kiddos weren’t a huge fan of the lime jello so you might want to skip that flavor.

IMG_4200[1]

IMG_4202[1]

Frankenstein Treat Cups – Click here for these.

IMG_4210[1]

Green Punch – Just mix some green Hawaiian Punch, lime sherbet, & Sprite for a quick & easy drink.

IMG_4194[1]

Eye Ball Cake Balls – Click here for this creepy recipe.

IMG_4193[1]

Monster Cookies – These were my contribution for the party. I found the recipe on Pinterest here. I was a little nervous when making them since the dough was a bit hard to work with, but they were a huge hit. I found the candy eye balls at Target though you can find them online as well.

Anyways, while looking on Pinterest I found so many other cool ideas you could add to these. It was definitely a theme you could just run with, a wonderful way to mix learning & fun. You could even use it for Halloween. Hope you enjoyed this party idea! And HAPPY NEW YEAR!!

#Tie-dyed Easter Eggs #Easter 2015


I’m still getting over being sick & just haven’t had the energy to do half of the things I wanted to do, make, or bake for Easter, but my kids weren’t going to let us skip dyeing eggs this year. It ended up being a blast (other than having to use a ton of bleach to get rid of all the dye that ended up on everyone’s hands and my counters lol) so I’m glad they didn’t let me be lazy. We tried a new way this year which resulted in the same “have I been doing everything the wrong way all my life” epiphany that I described in my Oven-Baked Bacon post. We’ve tried a couple ways of dying eggs throughout the years usually resulting in less than spectacular results. We’ve tried wrapping them with string or rubberbands to make stripes or adding stickers for a stenciled effect before dipping them but it usually resulted in the bands coming off mid dip or the stickers refusing to stick to our eggs, basically more frustration than fun. We’ve bought different egg dyeing kits some we’ve liked like & others were just a waste of money. Last year’s eggs turned out ok, kinda 50/50, liked some but on some of the eggs others the dye adhere well & came off in weird patches. The kids still enjoy it, but after this year experience, I think dipping our eggs is a thing of the past.

2014 easter eggs

2014 Easter Eggs

So after a little Pinterest-ing, I ran across this pin for Tie Dyed Easter eggs & was instantly intrigued. It is super easy & the results were so cool!

IMG_2981[1]

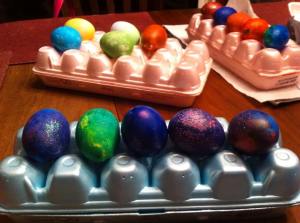
Here are some of this year’s Easter eggs… there are a few traditionally dipped ones in the mix & a few that my youngest did by just setting her eggs in a strainer in the sink, dumping the food coloring on them, & spinning them around (those also turned out pretty cool lol) but we are going to focus on the Tie Dyed ones.

Ok so on to how you make these beauties…

IMG_2984[1]

Here is a quick overview of our process before we get into detail…

Tie-Dyed Easter eggs

Supplies:

  • paper towels
  • ziploc bags
  • boiled eggs
  • vinegar
  • food coloring
  • plates (we used our regular dinner plates though plastic disposable plates would have been nice for easier clean up)

 Steps:

  • Dip your paper towel in vinegar & wring out excess.
  • Lay your paper towel out on your plate.
  • Add drops of food coloring until the colors pretty much cover the whole area *This is something where I told the kids not to put too much, but the ones that I believed were too “colorful” & would turn out looking black actually turned out better. Obviously their overzealous food coloring was perfectly fine. lol
  • Sit your boiled egg in the middle of your colored paper towel & wrap it completely.
  • Squish the paper towel around your egg & put the whole bundle into a plastic bag.
  • Let the eggs sit for about 30 minutes *The longer they are in there the brighter the colors got we did about 30 minutes, but some probably could have used longer. The original directions says anywhere from 5 minutes to a couple hours. Might just have to play with it at first to see what works best for your eggs.
  • Remove from bag & paper towel & sit your eggs out to dry.

IMG_3005[1]

Here are some of our completed Tie-Dyed Easter eggs. Unfortuantely the pictures really don’t do them justice, such beautiful colors & intricate designs that you’d have to see in person to truly enjoy!

IMG_3006[1]

Got a basket all ready to decorate our dinner table when we go over to Mema’s later 🙂

I hope you enjoyed this Easter egg decorating idea! Need some last minute ideas? Check out my Easter Pinterest board for inspiration! 🙂

IMG_2997[1]

Hope the Easter bunny brought you a bounty of goodies & that you have a blessed Easter with those you love!


#Bunny Buckets #Easter Egg Wreath Idea

I like to make little gifts for Destiny’s classmates a couple times a year. With Easter right around the corner, I looked on Pinterest for inspiration & found some really cute ideas. You can see some of my favorites on my Easter board by clicking here. I originally saw an adorable mason jar idea that I thought looked like a nice option but would need to do it with smaller jars since I have to make 18 & buy enough candy to fill them. I’ve been super sick for about a week now & not feeling well as that was coming on so after not being able to quickly locate the size & shape jars I was searching for, I abandoned that idea & started looking for alternate options. I often do just traditional “goodie bags” so I was trying to find something a little different this time. I have seen cute bunny buckets & saw some similar things on Pinterest, but still wasn’t finding exactly what I wanted so I started looking at the Oriental Trading website to see if I could locate something quick & easy to make since I didn’t feel like hand cutting bunny ears, noses, etc. in my current state.  What I love about Oriental Trading is that usually the craft kits & supplies as well as party supplies aren’t super expensive & they come in large quantities. I grabbed some 3″ white metal pails with handles & started looking through the Easter craft supplies to find something to easily make them into bunny buckets. I was tired & didn’t feel good so almost gave up when I happened across a Easter Bunny Picture Frame Craft kit. It wasn’t too expensive & had twelve kits just like the bucket quantity, and I felt that I could easily repurpose the supplies to fit my needs. Anyway enough of my tired ramblings, let me just show you what I came up with…

IMG_2923[1]

Here are my supplies… I only used the precut foam bunny parts & ribbon bows which already had peel & stick adhesive strips… yay… adorable & super easy to assemble. My only complaint about Oriental Trading foam craft kits in the past was that the self adhesive wasn’t as permanent as it should be, and unfortunately, while the majority of the bunnies held together fine, some of the front paws came loose in the night so I went through & added some Elmers glue to all the parts just to be safe. Even still I recommend this websites’ craft kits because they are adorable, inexpensive, easy to put together, come all individually wrapped making them perfect for large group events, & usually come with a few spare parts just in case. Only keep in mind that you might want to save the extra step when using ones with self-adhesive strips & just go straight for your glue during assembly for longer lasting, sturdier creations. I ended up with 24 foam frames, frame backs, magnets, & tons of foam circle stickers that I didn’t use, but I definitely will be able to add these to my craft supply stock for a future project! They won’t go to waste in this household. you might even see them in a future blog post! lol

IMG_2922[1]

They say a picture is worth a thousand words… so I’m gonna skip lengthy, step-by-step directions and just show you how we put these bunny buckets together. Destiny has 9 girls & 9 boys in her class so she wanted to only add the bows to the girl bunnies.

IMG_2927[1]

I think they turned out just perfect… just like I pictured them in my head! Since the buckets are quite small, I didn’t have to buy a lot of candy to fill them up either, just a pack of fun size Easter M&Ms & 3 small pieces of candy & they are ready to go!

It’s been a rough month so far for me… first a back injury & then 2 weeks later I was down with bronchitis & an upper respiratory infection… so I am awfully bummed I haven’t gotten to the many Easter craft & recipes I planned to make & share with you. That’s life though, doesn’t always go as planned. It seems like the older I get, the faster time flies by or maybe it’s just because we are busier. I’m not even sure when I will fit dying eggs in or helping the Easter Bunny fill the baskets so this might be my only Easter related post this year. :/

IMG_0201

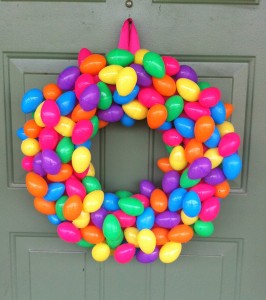
Here is another one of my past Easter projects I wanted to share. I’ve made Easter Egg Wreaths since then for family members. It was one of my all time favorite Pinterest projects & probably one of the first ones I actually saw & made. It just takes a few supplies: ribbon, hot glue, a foam wreath, & lots & lots of plastic Easter eggs.  I’ve had this one for years… still looks just as bright & festive every time I put it out & if, heaven forbid, I loose an egg or 2 in storage, a little hot glue puts it good as new! If you like this idea but your busy schedule keeps you from creating it in time, wait & take advantage of the 50% off Easter eggs that are always abundant afterwards. That’s what I did. Honestly most of my holiday decorations have been picked up for dirt cheap after that holiday is over & then I use them for the next year. Click here for detailed instructions. I believe this is the site I found through Pinterest when I made my first wreath.

149

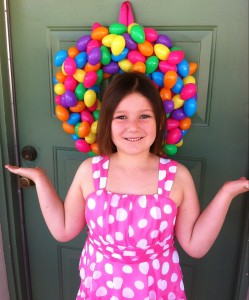
Throwback to last Easter… I love this picture!!

In case life gets too crazy, I’ll just wish you a Happy Easter now, from my family to yours! ❤